Walk through a newly constructed luxury home in Wah, Rawalpindi, or Islamabad six months after the handover, and you will often spot a heartbreaking aesthetic failure. Right where the smooth plastered brick wall meets the reinforced concrete column or lintel beam, a jagged, vertical hairline crack begins to form. Over time, it stretches from the skirting board to the ceiling, tearing through expensive emulsion paint or designer wallpaper.
In local real estate, homeowners often blame poor paint or “settling.” But as any Senior Site Execution Engineer will tell you, this is a structural physics problem known as Differential Movement.
If you want your interior finishes to remain flawless for decades, relying on basic plastering is a guaranteed path to disappointment. The absolute defense against this common eyesore is a simple, highly effective engineering protocol: The Chicken Wire Hack.
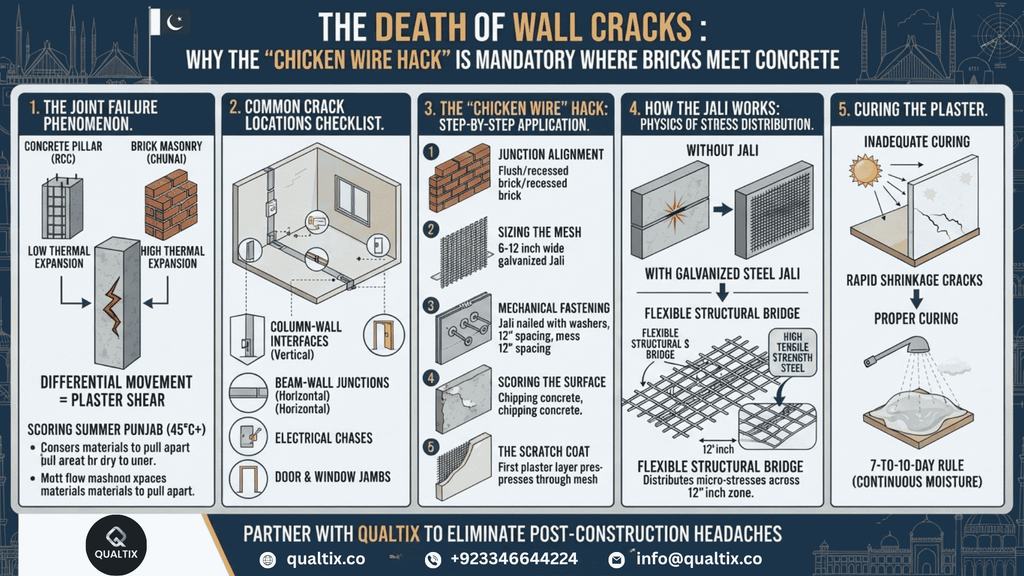
1. The Joint Failure Phenomenon: Why Columns and Bricks Tear Apart
To understand why cracks form at column-wall junctions, you must look at how different materials behave under thermal stress.
- The Concrete Pillar: A reinforced cement concrete (RCC) column is a dense, monolithic mass of stone aggregate, sand, cement, and heavy steel rebar. It absorbs and retains heat slowly, and its thermal expansion and contraction rate is low.
- The Brick Masonry (Chunai): Baked clay bricks bonded with standard mortar are more porous, less dense, and possess a completely different thermal expansion coefficient.
During the scorching summer months in Punjab—where outdoor temperatures soar past 45°C—and the freezing winter nights, concrete and brick expand and contract at different rates and times.
When plaster is applied directly over the flat, smooth junction where a concrete column meets brickwork, there is no mechanical interlock. As the two materials pull in opposite directions, the plaster layer is caught in the middle. Lacking the elasticity to bridge the gap, it shears right down the middle, creating that dreaded jagged crack.
Furthermore, once a hairline crack breaches the surface, it opens a gateway for moisture (Shor/Seem), leading to bubbling paint and structural dampness.
2. Common Crack Locations Checklist
During a post-construction inspection, you will typically find differential movement cracks manifesting in these exact structural zones:
- Column-Wall Interfaces: Vertical cracks running continuously from floor to ceiling right where brickwork meets an RCC pillar.
- Beam-Wall Junctions: Horizontal cracks appearing at the top of a wall where it meets a concrete lintel beam or roof slab.
- Electrical Chases: Jagged lines following the path of concealed PVC electrical conduit pipes cut into brickwork before plastering.
- Door and Window Jambs: Diagonal stress fractures radiating from the corners of door and window frames due to structural shifting.
3. The “Chicken Wire” (Galvanized Steel Jali) Hack: Step-by-Step Application
To prevent the plaster from tearing at these vulnerable junctions, professional site execution teams use a stress-distribution method involving a Galvanized Steel Wire Mesh (locally known as Jali).
Here is the precise, step-by-step installation protocol that must be executed before a single trowel of plaster touches the wall:
- Junction Alignment Check: Ensure that the brickwork is flush or slightly recessed relative to the concrete column face, allowing adequate depth for the plaster buildup.
- Sizing the Mesh: Cut a strip of galvanized steel wire mesh (Jali) measuring 6 to 12 inches wide. The strip must overlap the joint equally—meaning 3 to 6 inches of the mesh must sit on the concrete column, and 3 to 6 inches must sit on the brick masonry.
- Mechanical Fastening: Do not rely on plaster to hold the mesh in place. Secure the Jali firmly across the joint using concrete nails and washers spaced every 12 inches. The mesh must be stretched taut and lie completely flat against the wall without buckling.
- Scoring the Surface: Before nailing the mesh, lightly chip or “bough” the smooth surface of the concrete column to create a mechanical key, ensuring the underlying scratch coat has maximum grip.
- The Scratch Coat (First Plaster Layer): Apply an initial rich sand-cement mortar coat, pressing it firmly through the diamond openings of the wire mesh so that the steel is completely embedded and protected from future rust.
4. How the Jali Works: The Physics of Stress Distribution
Why does this low-cost wire mesh save million-rupee paint jobs?
The Jali acts as a flexible structural bridge. When thermal movement occurs and the brick wall attempts to shift independently of the concrete column, the stress is no longer concentrated along a single brittle line of plaster.
Instead, the high tensile strength of the galvanized steel wire absorbs the kinetic energy, distributing the micro-stresses evenly across a 12-inch wide zone. The mesh holds the plaster matrix together, preventing it from shearing or separating. It converts a point of structural failure into a unified, reinforced composite joint.
5. Curing the Plaster: The Final Half of the Equation
Even the highest-grade galvanized Jali will fail if the plaster curing process is neglected.
Cement does not “dry” to gain strength; it undergoes a chemical process called hydration, which requires continuous moisture. If fresh internal and external plaster is left unwatered under a hot sun or dry wind, it shrinks rapidly, causing massive micro-cracking throughout the wall surface.
- The 7-to-10-Day Rule: Plastered walls must be kept continuously moist through curing (spraying water or hanging wet Hessian cloth) for a minimum of 7 to 10 days.
- Combined Defense: The wire mesh stops mechanical joint separation from thermal movement, while proper 10-day curing stops chemical shrinkage cracks. Together, they eliminate wall cracking entirely.
Architectural Warning: Never allow laborers to skip the anti-crack mesh on column-wall joints to save a few rupees on material costs. Once the paint goes on, retrofitting a fix requires cutting open the wall, rendering the repair twice as expensive as doing it right during the structural rough-in phase.
Eliminate Post-Construction Headaches with Qualtix
Wall cracks are not an inevitable part of owning a home in Pakistan; they are a symptom of outdated construction shortcuts. At Qualtix, we believe that true structural integrity extends right down to the finishing details.
Eliminate post-construction headaches by partnering with Qualtix, where rigorous structural detailing like anti-crack galvanized mesh is standard practice, not an optional extra. Contact our engineering team today to build your next project right the first time.